The visual impact of an acrylic pool waterfall relies entirely on how light interacts with the material and the moving water. Poor placement flattens the aesthetic, leaving the feature looking dull and uninspired after sunset. Strategic illumination creates dynamic refraction, depth, and movement. Architects, builders, and facility managers frequently treat lighting as an afterthought during the design phase. This oversight results in surface glare, exposed fixtures, thermal damage to the acrylic, or costly code compliance failures.
Evaluating lighting placement techniques, voltage requirements, smart automation integration, and structural methods solves these issues. Proper planning maximizes the safety and visual appeal of a high-end water feature. By understanding the physics of light transmission through acrylic and water, project teams can engineer flawless illumination. We will break down exactly how to position fixtures, select the right hardware, and avoid common construction pitfalls to transform a simple water drop into a striking architectural focal point.
Key Takeaways
Placement Dictates Effect: Backlighting, submerged uplighting, and integrated LED strips yield vastly different refractive outcomes and require distinct structural planning based on the waterfall's style (e.g., sheer descent vs. rain curtain).
Code Compliance is Non-Negotiable: Wet niche, low-voltage specifications, and waterproof connectors must strictly align with local commercial and residential pool codes (e.g., NEC Article 680).
Smart Automation Unlocks Value: Integrating lighting with central pool control systems enables synchronized RGBW color-changing and scheduling, elevating the overall user experience.
Material and Water Clarity: The effectiveness of underwater lighting relies heavily on pool water turbidity and the optical grade of the acrylic used.
Early Supplier Collaboration: Engaging an experienced acrylic pool waterfall supplier during the architectural drafting phase prevents the need for expensive, high-risk retrofitting.
The Physics of Light and Acrylic in Pool Environments
Refraction and Total Internal Reflection (TIR)
Understanding how light travels through optical-grade acrylic versus water is foundational to successful illumination. Acrylic has a specific refractive index, typically around 1.49, while water sits at approximately 1.33. This difference dictates exactly how light bends when passing from one medium to another. When light enters an acrylic panel at the correct angle, it triggers a phenomenon known as Total Internal Reflection (TIR). The light becomes trapped inside the acrylic sheet, bouncing between the internal surfaces until it reaches an edge or a break in the material.
This physical property makes edge-lighting highly effective. By directing a focused LED beam directly into the back or bottom edge of the acrylic, the entire panel acts as a light guide. The success criteria for achieving this effect without unwanted light bleed rely on precise beam angle control and edge preparation. If the acrylic edge is saw-cut rather than flame-polished or mechanically polished, the light scatters immediately upon entry. Furthermore, if the light source is misaligned by even a few degrees, the beam escapes the acrylic prematurely. This floods the surrounding pool structure with unwanted light and diminishes the glowing effect of the waterfall itself. Precision mounting channels are necessary to keep the light source perfectly aligned with the polished acrylic edge.
Water Clarity and Illumination Depth
The effectiveness of any submerged or integrated lighting system depends heavily on pool water turbidity. Suspended particles, imbalanced chemicals, and microscopic organic matter absorb and scatter light. Even the most powerful LED fixtures will struggle to penetrate cloudy water. Maintaining strict chemical balance and optimal filtration is mandatory for high-end illuminated water features. The Langelier Saturation Index (LSI) must remain balanced to prevent calcium scaling on the acrylic, which acts as a physical barrier to light transmission.
To maintain the optical clarity required for underwater lighting, operators must follow strict maintenance protocols:
Test and adjust the pH levels weekly to keep them between 7.4 and 7.6, preventing acidic etching or basic scaling on the acrylic surface.
Monitor calcium hardness, keeping it strictly between 200 and 400 ppm to stop carbonate deposits from forming over the LED lenses.
Clean the pool filters regularly to maintain a turbidity level below 0.5 NTU (Nephelometric Turbidity Units), ensuring maximum light penetration.
Wipe down the acrylic spillway weekly with a non-abrasive, specialized acrylic cleaner to remove organic biofilm buildup.
Illumination depth also dictates fixture selection. Water absorbs different wavelengths of light at different rates. Red light is absorbed quickly, while blue and green light penetrate deeper. For larger or deeper installations, a single light source at the origin of the waterfall may not suffice. Evaluating the necessity of secondary wash lights becomes critical. A primary light source might illuminate the acrylic lip, while secondary submerged fixtures capture the kinetic energy of the water as it strikes the pool surface. This layered approach ensures the entire feature remains visible and dynamic, regardless of the water's depth.
Core Lighting Placement Strategies for an Acrylic Pool Waterfall
Integrated LED Strips (Internal/Lip Lighting)
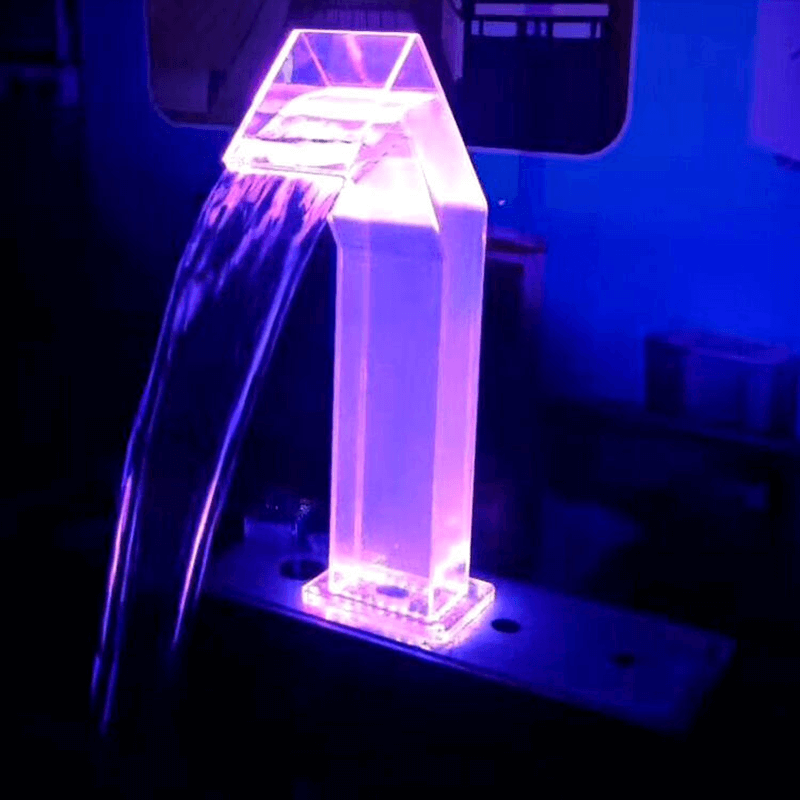
Embedding IP68-rated LED strips directly into the waterfall housing or the acrylic lip represents the most streamlined approach to illumination. This mechanism positions the light source in direct contact with the origin of the water flow. The light travels through the acrylic pool waterfall, catching the sheer descent of the water directly from the source. Installers typically route a 1-inch Schedule 40 PVC conduit directly into the back of the waterfall housing to feed the low-voltage wire to the LED strip.
The primary outcome is a seamless, modern aesthetic. The hardware remains completely hidden from view, allowing the glowing water to command attention. However, this strategy involves significant trade-offs. Maintenance access is inherently difficult. If an integrated LED strip fails, replacing it often requires specialized tools or partial disassembly of the housing. This method requires precision engineering and pre-fabrication. The housing must include dedicated, water-tight channels to house the LED strips while managing heat dissipation. Builders must leave a precise block-out in the concrete bond beam to accommodate the housing without crushing the conduit.
Submerged Uplighting (Sunshelf, Bench, or Floor Placement)
Submerged uplighting involves installing vertical lights on an architectural feature directly beneath the cascade. Builders frequently utilize sunshelves, submerged benches, or the pool floor for this placement. The fixtures are aimed directly upward, intercepting the falling water. This mechanism captures the kinetic energy of the water hitting the surface. During construction, the gunite crew shoots the concrete around a brass or stainless steel wet niche, which houses the light fixture flush with the plaster finish.
The outcome is a dramatic, playful shimmering effect across the splash zone. The light illuminates the bubbles and surface agitation, creating a highly dynamic visual. The main trade-off is the high potential for surface glare. If the beam angle is too wide or the fixture is placed too shallow, the light can blind people sitting near the pool. This strategy requires strict wet niche compliance and precise beam angle calibration. Narrow spot beams, typically around 15 degrees, are generally preferred over wide 45-degree flood beams to keep the light contained tightly within the water column.
Backlighting and Rear Wash Lighting
Backlighting involves illuminating the wall, alcove, or physical space directly behind the acrylic structure. Instead of lighting the water directly, this mechanism relies on the transparency of the material. By washing the rear wall with light, the moving water creates striking silhouette effects and shadows. Installers mount linear wall washers or directional spotlights on the ceiling or floor of the alcove housing the water feature.
This approach highlights the pristine transparency of a custom acrylic pool feature. It creates a sense of depth, making the waterfall appear to emerge from a glowing cavern. The primary trade-off involves finishing details. Backlighting will ruthlessly expose structural mounting hardware, plumbing pipes, or masonry imperfections. The rear cavity must be flawlessly finished, waterproofed with a high-quality membrane, and often painted a reflective color to maximize the light bounce and conceal the mechanics.
Adapting Placement for Feature Scale and Style
Lighting strategies must scale with the physical dimensions of the installation. Long-span installations, such as 8-to-10-foot continuous features, present unique challenges. A single light source will leave the edges dark. These large-scale features require multiple synchronized vertical uplights or continuous LED channels to prevent dark spots and ensure uniform illumination across the entire span. When running continuous LED strips over 10 feet, installers must feed power from both ends of the strip to prevent voltage drop and ensure the center glows just as brightly as the edges.
Style variations also dictate placement. A solid sheer descent requires a focused beam spread to illuminate the continuous sheet of water. The light needs to travel down the unbroken surface. Conversely, an acrylic rain waterfall breaks the water into individual droplets. This style requires wider wash lighting to catch the thousands of individual falling drops. The scattered light creates a glittering effect, demanding a completely different fixture selection and placement angle than a sheer descent.
Lighting Placement Strategy Comparison
| Placement Strategy | Visual Effect | Installation Complexity | Best Application |
| Integrated LED Strips | Seamless edge glow, highlights water origin | High (Requires pre-fabrication and conduit routing) | Modern, minimalist sheer descents |
| Submerged Uplighting | Dynamic surface shimmer, highlights splash zone | Medium (Requires wet niche planning in gunite) | Features over sunshelves or submerged benches |
| Rear Backlighting | Silhouette effects, emphasizes depth | Medium (Requires flawless rear cavity finishing) | Alcove installations, textured rear walls |
Technical Evaluation: Voltage, Compliance, and Hardware
Low-Voltage vs. Line-Voltage Systems
Selecting the correct voltage is a critical safety and operational decision. Traditional line-voltage options (120V) are obsolete for direct water feature integration due to severe safety risks. Low-voltage systems, specifically 12V or 24V DC, are the industry standard. A 24V system is superior for longer continuous LED runs, as it mitigates voltage drop that causes lights to dim at the far end of the strip. For example, a 12V system might experience noticeable dimming after 15 feet of continuous LED tape, whereas a 24V system can push up to 30 feet before requiring a new power injection.
Safety mandates strictly regulate these choices. When specifying a commercial pool water feature, low-voltage systems drastically reduce the risk of electric shock. Transformers must be isolated and located a specific distance from the water's edge, usually a minimum of 10 feet according to most local codes, ensuring that only harmless low voltage reaches the actual waterfall structure.
Smart Automation and RGBW Synchronization
Modern water features demand intelligent control. Integrating waterfall lighting with central pool automation systems elevates the installation from static to dynamic. DMX512 controllers and specialized relays allow operators to manage the waterfall alongside standard pool lighting, landscape lighting, and pump speeds. DMX systems use a daisy-chain topology, requiring a specific RS-485 communication cable to link the fixtures back to the main controller.
Technical requirements for synchronization involve careful wiring and compatible protocols. The fixtures must support RGBW (Red, Green, Blue, White) color mixing. By assigning specific DMX addresses to each fixture, programmers can create cohesive color-changing effects, chasing sequences, and automated scheduling. This ensures the waterfall matches the ambient mood of the entire outdoor space. You can program the system to trigger a bright white sheer descent during evening swim hours and transition to a deep blue glow during late-night hours.
Waterproofing and Connector Integrity
Water and electricity are a hazardous combination, making hardware selection paramount. IP68-rated fixtures are non-negotiable for any submerged or heavily splashed component. IP68 signifies that the fixture is dust-tight and protected against continuous submersion in water. Wet niche housings provide an additional layer of protection, allowing the fixture to sit inside a dedicated, water-cooled cavity built directly into the pool wall.
Connector integrity is a common failure point. Installers must use resin-filled waterproof connectors or factory-vulcanized splices. A major risk in pool lighting is capillary action, where water wicks up the inside of the wiring jacket, traveling directly into the transformer or control box. Proper potting and sealing at every junction mitigate this risk. Technicians fill the splice boxes with a two-part epoxy potting compound, ensuring the internal copper wiring remains completely dry even if the outer junction box floods.
Code Compliance and Safety Standards
Adherence to electrical codes is a legal and moral obligation. In the United States, the National Electrical Code (NEC) Article 680 governs the installation of underwater luminaires. These standards apply rigorously to both residential and commercial installations. Failing an electrical inspection delays the project and forces costly tear-outs of finished concrete.
Key requirements include comprehensive bonding and grounding. Every metallic component near the water feature, including the wet niche and the waterfall housing brackets, must be tied into the pool's equipotential bonding grid using an 8 AWG solid bare copper wire. This prevents stray voltage from energizing the water. Furthermore, all lighting circuits must feature Ground Fault Circuit Interrupter (GFCI) protection. If the system detects even a minuscule leak of current, the GFCI trips instantly, cutting power and preventing injury. Strict compliance ensures the facility passes inspection and remains safe for all users.
Implementation Risks and Mitigation Strategies
Managing Glare and Viewing Angles
Poorly angled uplights present a significant risk. If the beam escapes the water column, it can blind pool users, spectators, or even shine directly into adjacent properties. This ruins the ambiance and creates a safety hazard around the pool deck. Glare is especially problematic in shallow sunshelves where the water depth is insufficient to diffuse the light source.
Mitigation requires precise optical control. Installers must utilize physical barriers like honeycomb louvers, eyelids, or glare shields on the fixtures. Furthermore, precise beam angle selection is critical. A narrow 15-degree spot beam focuses the light tightly on the falling water, whereas a wide 45-degree flood beam will inevitably spill over the edges. Testing the angles at night before finalizing the concrete or mounting hardware is a necessary step. You can temporarily wire the fixtures and adjust their tilt to ensure the light hits the acrylic perfectly without spilling onto the deck.
Ensuring Maintenance Accessibility
A failed lighting fixture should never require draining the pool, breaking concrete, or dismantling the acrylic structure. Unfortunately, poor planning often leads to exactly this scenario. Inaccessible hardware turns a minor maintenance task into a major construction project.
To mitigate this, design systems with accessibility in mind. Follow these specific construction steps:
Utilize oversized 1-inch or 1.5-inch rigid PVC conduits for all lighting runs to provide ample room for the wire jacket.
Install long-sweep elbows instead of hard 90-degree fittings to prevent the wire from snagging during installation or removal.
Leave a dedicated pull-cord inside the conduit alongside the lighting wire, allowing technicians to easily pull new cables in the future.
Mandate the use of accessible dry or wet niches that allow the light engine to be removed from the front of the pool wall without accessing the rear of the structure.
Specify high-lifespan LEDs rated for 50,000 hours or more to drastically reduce the frequency of required maintenance.
Thermal Management in Acrylic Enclosures
Acrylic is highly sensitive to heat. High-output lighting fixtures generate significant thermal energy. If this heat is trapped against the acrylic, it causes heat degradation, warping, or crazing (the formation of microscopic structural cracks). Once crazing occurs, the structural integrity and visual clarity of the panel are permanently ruined, requiring a complete replacement of the waterfall unit.
Mitigation strategies focus on strict hardware selection and environmental engineering. Strictly mandate LED technology over older halogen or incandescent options, as LEDs produce a fraction of the heat. For submerged fixtures, ensure the design allows for adequate water-cooling flow around the housing. The pool water acts as a massive heat sink, drawing thermal energy away from the acrylic and the LED diodes. For dry-mounted integrated strips, the housing must include an aluminum extrusion channel that acts as a heat sink, dissipating the thermal load away from the acrylic lip.
Procurement and Supplier Vetting
Vetting an Acrylic Pool Waterfall Supplier
The success of the lighting integration depends heavily on the manufacturing quality of the waterfall itself. Sourcing from a generic plastics fabricator often leads to critical failures in the field. Project managers must define strict criteria for supplier selection to ensure structural and optical integrity.
Prioritize an acrylic pool waterfall supplier with proven in-house lighting integration capabilities. The supplier should understand optical grading, edge-polishing techniques for light transmission, and watertight channel routing. Assess their ability to provide detailed CAD drawings. These drawings must explicitly show conduit locations, niche integration details, and automation wiring pathways. A reputable supplier will also offer comprehensive material warranties and demonstrate a proven track record of meeting commercial code compliance standards. Engaging this supplier during the initial architectural drafting phase prevents the need for high-risk retrofitting later in the build.
Conclusion
Finalize the desired visual effect (sheer glow vs. surface shimmer) before pouring any concrete or ordering materials.
Consult with a specialized acrylic fabricator to design custom light-routing channels directly into the waterfall housing.
Hire a licensed pool electrician to map out the low-voltage conduit runs, bonding grid connections, and GFCI placements.
Select IP68-rated, RGBW LED fixtures and verify their compatibility with your central pool automation controller.
FAQ
Q: What is the best lighting placement for a sheer descent acrylic waterfall?
A: Integrated LED strips placed at the rear or bottom lip of the acrylic provide the best results. This edge-lighting technique utilizes total internal reflection, allowing the light to travel through the acrylic and illuminate the continuous sheet of water seamlessly without exposing any hardware.
Q: Does lighting placement differ between a sheer descent and an acrylic rain waterfall?
A: Yes. A sheer descent requires focused, narrow-beam light to illuminate the solid sheet of water. An acrylic rain waterfall, which breaks water into individual droplets, requires wider wash lighting to catch the scattered drops and create a glittering effect across a broader area.
Q: Can I retrofit lighting into an existing custom acrylic pool feature?
A: Retrofitting is highly difficult and often risky. Drilling into existing acrylic can cause cracking or compromise the watertight seal. The best approach for existing features is adding submerged uplighting in the pool floor or bench beneath the waterfall, avoiding modifications to the acrylic itself.
Q: What are the electrical code requirements for commercial pool water feature lighting?
A: Commercial installations must strictly follow NEC Article 680. This requires the use of low-voltage systems (typically 12V or 24V), comprehensive equipotential bonding of all metallic parts, GFCI protection on all lighting circuits, and the use of IP68-rated fixtures for submerged applications.
Q: How do you prevent glare when uplighting a pool waterfall from a submerged bench or sunshelf?
A: Prevent glare by using narrow beam angle fixtures (e.g., 15 degrees) that keep the light focused tightly on the falling water. Additionally, install physical glare shields, honeycomb louvers, or eyelids on the fixtures to block stray light from reaching the eyes of people on the pool deck.
Q: Can high-output lights cause thermal damage to an acrylic pool waterfall?
A: Yes. Acrylic is sensitive to heat and can warp or develop micro-cracks (crazing) if exposed to high temperatures. To prevent this, always use low-heat LED fixtures instead of halogens, and ensure submerged lights have adequate water flow around them to dissipate thermal energy.


